Chances are, your kitchen has plenty of storage spaceit’s just that a good chunk of it is hidden in the hard-to-get-at corners, nooks and crannies of your cabinets. Deep base cabinets and corner cabinets pose particular problems. We will show you some kitchen cabinet storage projects that create more storage space and make existing cabinet space more accessible. Each project is constructed using readily available lumber, plywood, hardware, L-moldings, glue and screws.
Since many cabinet openings differ from ours in height and width, we’ll concentrate on the basic steps and key measurements rather than exact dimensions. Some of these projects are mounted to cabinet doors or face frames. Make sure your cabinets, doors and hinges are in good shape and that you don’t overload your finished projects with heavy cans and other objects.
For speed and accuracy, we recommend you borrow, buy or rent a power miter saw to finish these kitchen storage projects. We start with the easiest project and end with the hardest, so if you’re a beginner, you can build your do-it-yourself skills and confidence as you work your way through.
Door-Mounted Spice and Lid Racks
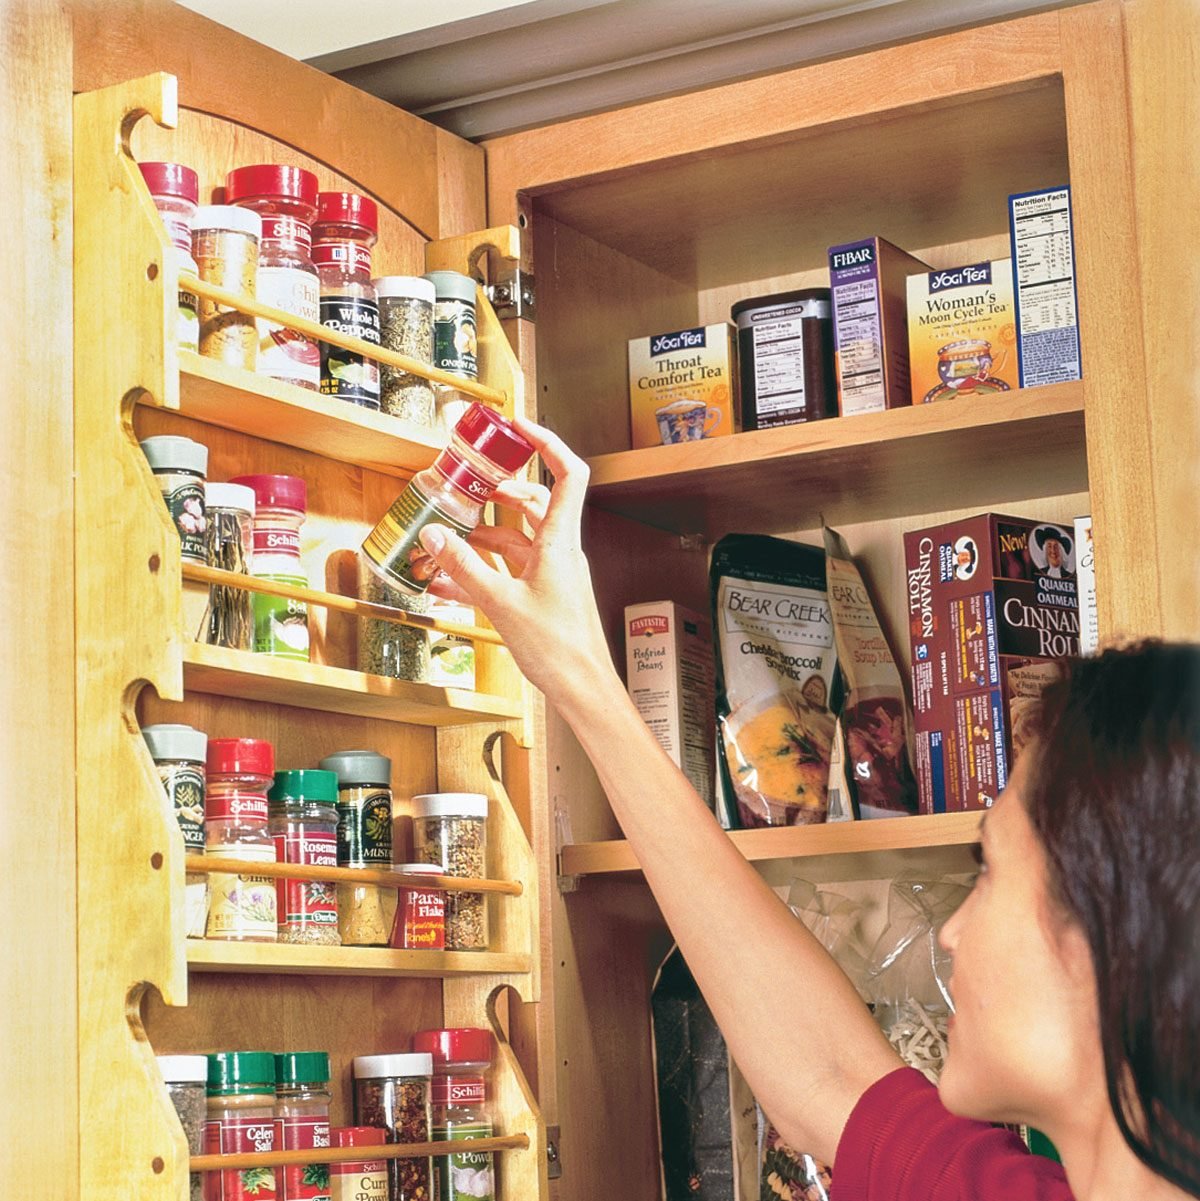
These simple kitchen storage projects will help transform those chaotic gangs of spice bottles and pan lids into orderly regiments. We show you how to build the spice rack; the lid rack uses the same steps but without the shelves. Each spice rack can hold 20 to 30 bottles, and each lid rack has two to six lids, depending on the height and width of your cabinet doors. Before building, measure your spice bottles and lids to determine the spacing of your shelves and dowels. Here are other key measurements and clearances to keep an eye on:
Existing shelf depth
If the existing cabinet shelves are full depth, narrow them by about 2 in. to accommodate each door-mounted rack. Shelves that are permanently affixed in grooves in the cabinet sides will need to be removed, cut along the backside with a circular saw or table saw, then replaced. You may need to move brackets or add holes to remount narrowed shelves.
Spice rack depth and positioning
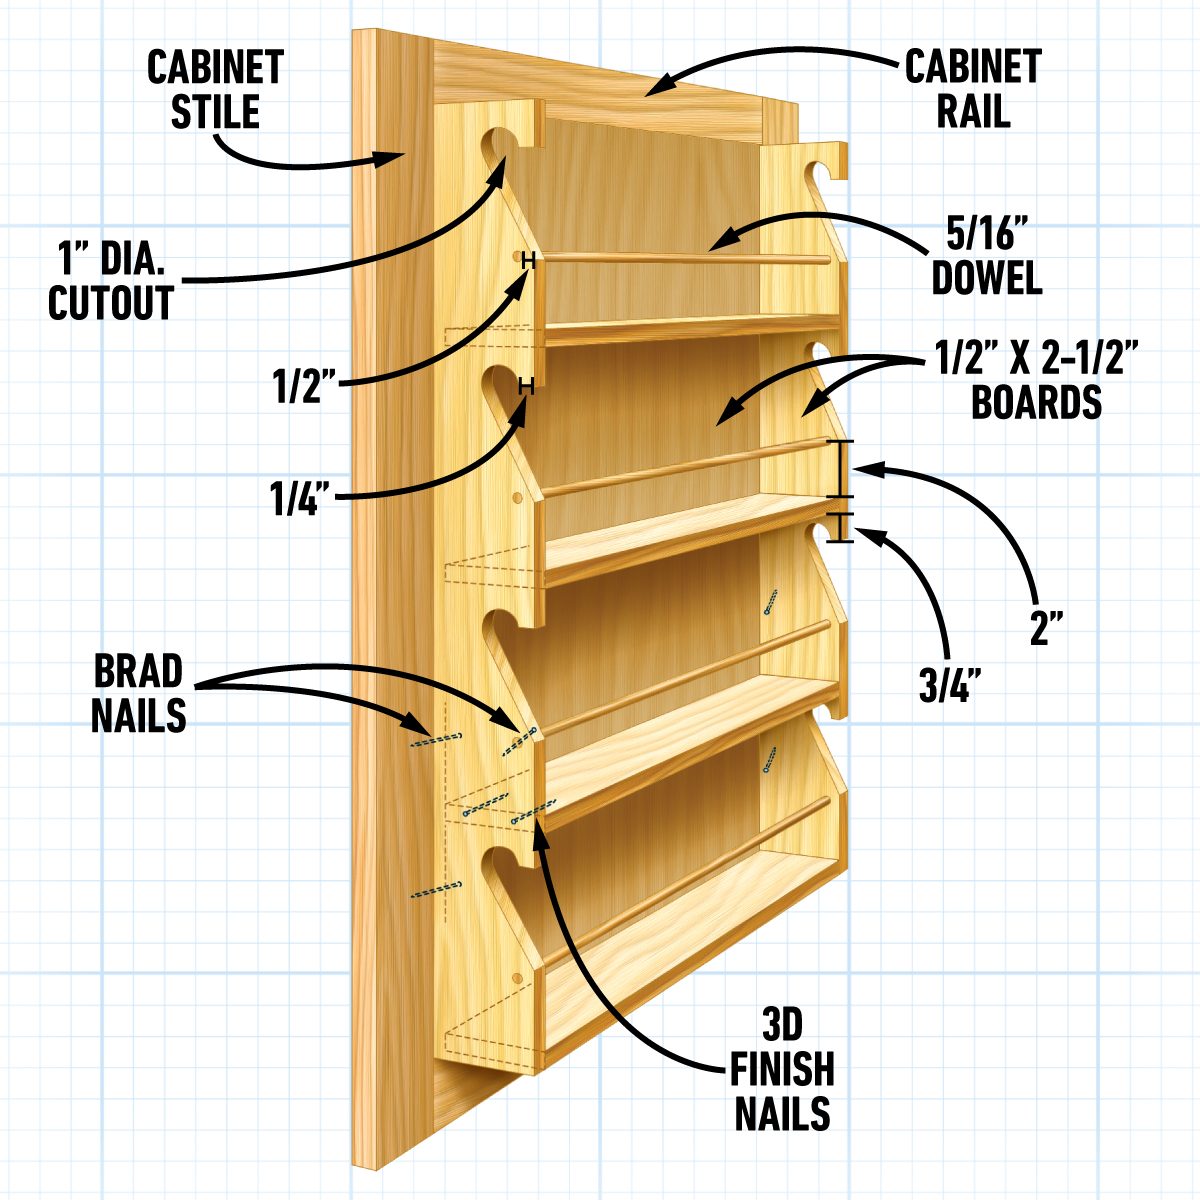
Make certain the new rack won’t hit the cabinet frame when the door swings. We found that fitting the rack between the two 2-in. wide vertical stiles gave us adequate room. If your doors are solid wood or laminate, hold in place a scrap of wood the same depth as the spice rack (2-1/2 in. was the depth we used) and swing the door. Move it away from the door edge until it no longer makes contact with the cabinet frame, then mark the door. This will determine the overall width of your spice rack.
We used soft, easy-to-nail pine and basswood for both the spice and the lid racks. If you’re using a harder wood, like maple or oak, position the pieces, then pre-drill holes through the side pieces and into the shelf ends. This will prevent splitting and make nailing easier. Install your shelves one at a time so you don’t have to balance and juggle multiple pieces as you work. Always nail on a flat, solid surface.
Borrow or rent a compressor, finish nailer and brad gun, if you can. You’ll work faster, eliminate hammer marks and split the wood less often than you would hand-nailing these kitchen storage projects.
Measure the distance between the two vertical stiles and the two horizontal rails to determine the outside dimensions of your spice rack. Cut existing shelves back 2 1/2 ins. so they don’t interfere with the rack when the door is closed.
Transfer the dimensions from Fig. A onto 1/2 x 2-1/2 in. side boards. Cut out the sides of the spice rack. Drill 1-in. holes to create the circular shape, then finish the cutout with a jigsaw. Drill 5/16-in. holes for the dowels. Sand the edges and surfaces smooth.
Glue and nail the shelves in place one at a time, using 3d finish nails. Then use 3/4-in. brads to pin the dowels in place. Sink all nailheads using a nail set. Apply polyurethane or another finish to match the cabinets.
Clamp the finished spice rack to the door. Then drill angled pilot holes through the rack and into the door every 8 in. and secure the rack with brad nails. Remove the door for this step if you find you need a more solid surface for hammering. Use carpenter’s glue for a more permanent installation.
Use Swing Down Hinges for a Cookbook Rack
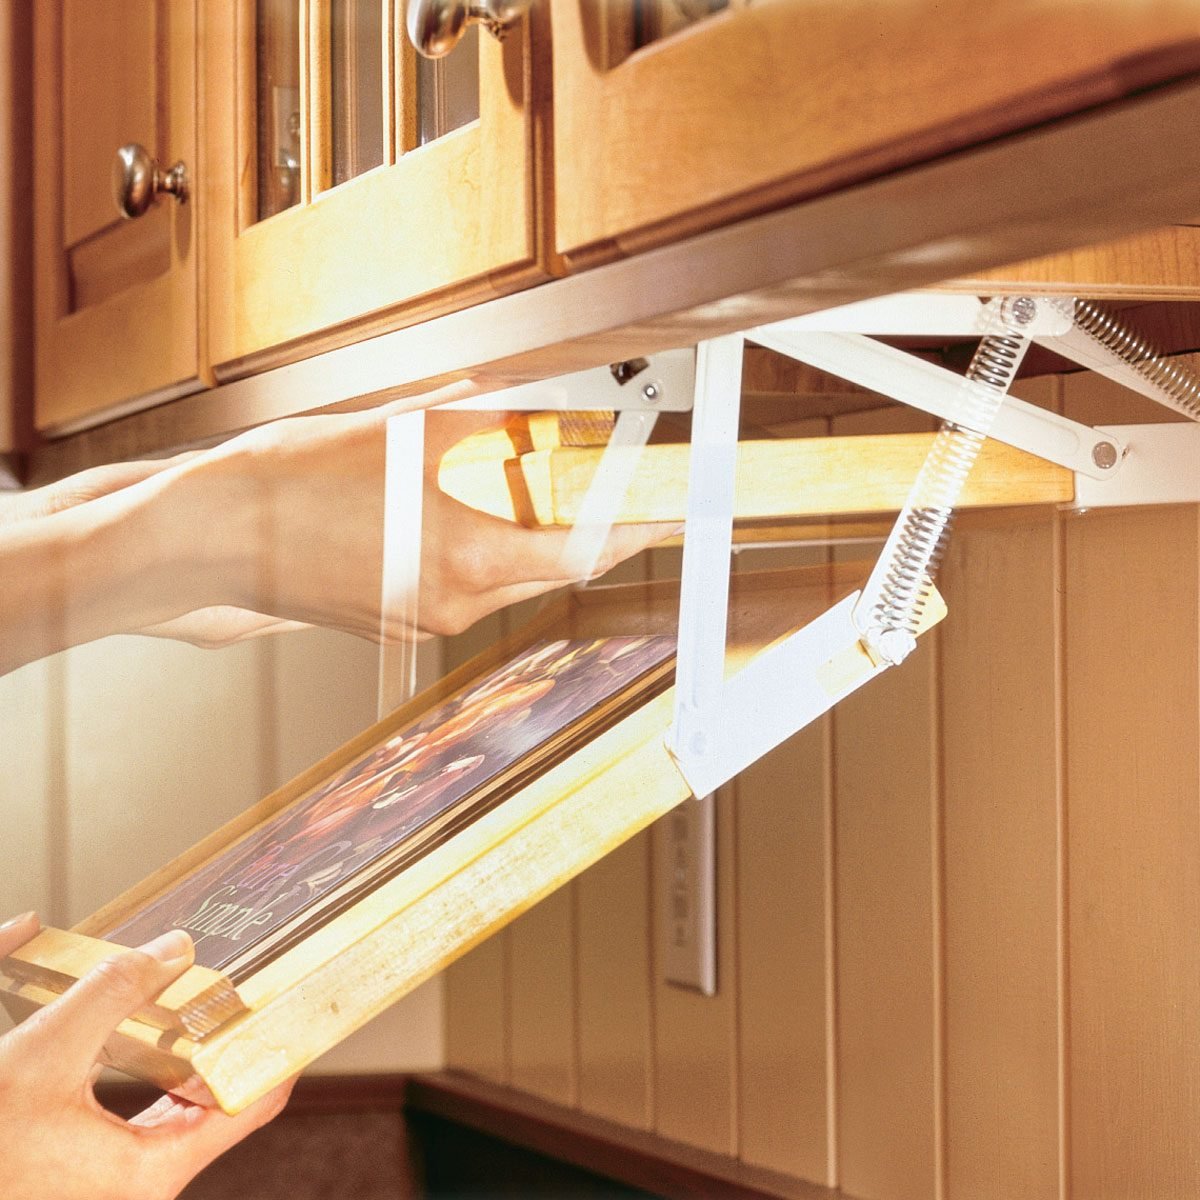
When counter space is at a minimum and counter mess at a maximum, this swing-down rack will keep your cookbook up and out of the fray. The special spring-loaded brackets allow you to swing your cookbook down when you need it, then out of the way when you’re done.
Our cookbook platform tucks under a single cabinet. But you can make your platform larger to hold larger books, then mount it beneath two cabinets. This is one of our more versatile kitchen storage projects; with a little creativity, you can use this same hardware to create a swing-down knife rack or spice rack too. Fold-down brackets are available at home centers and online.
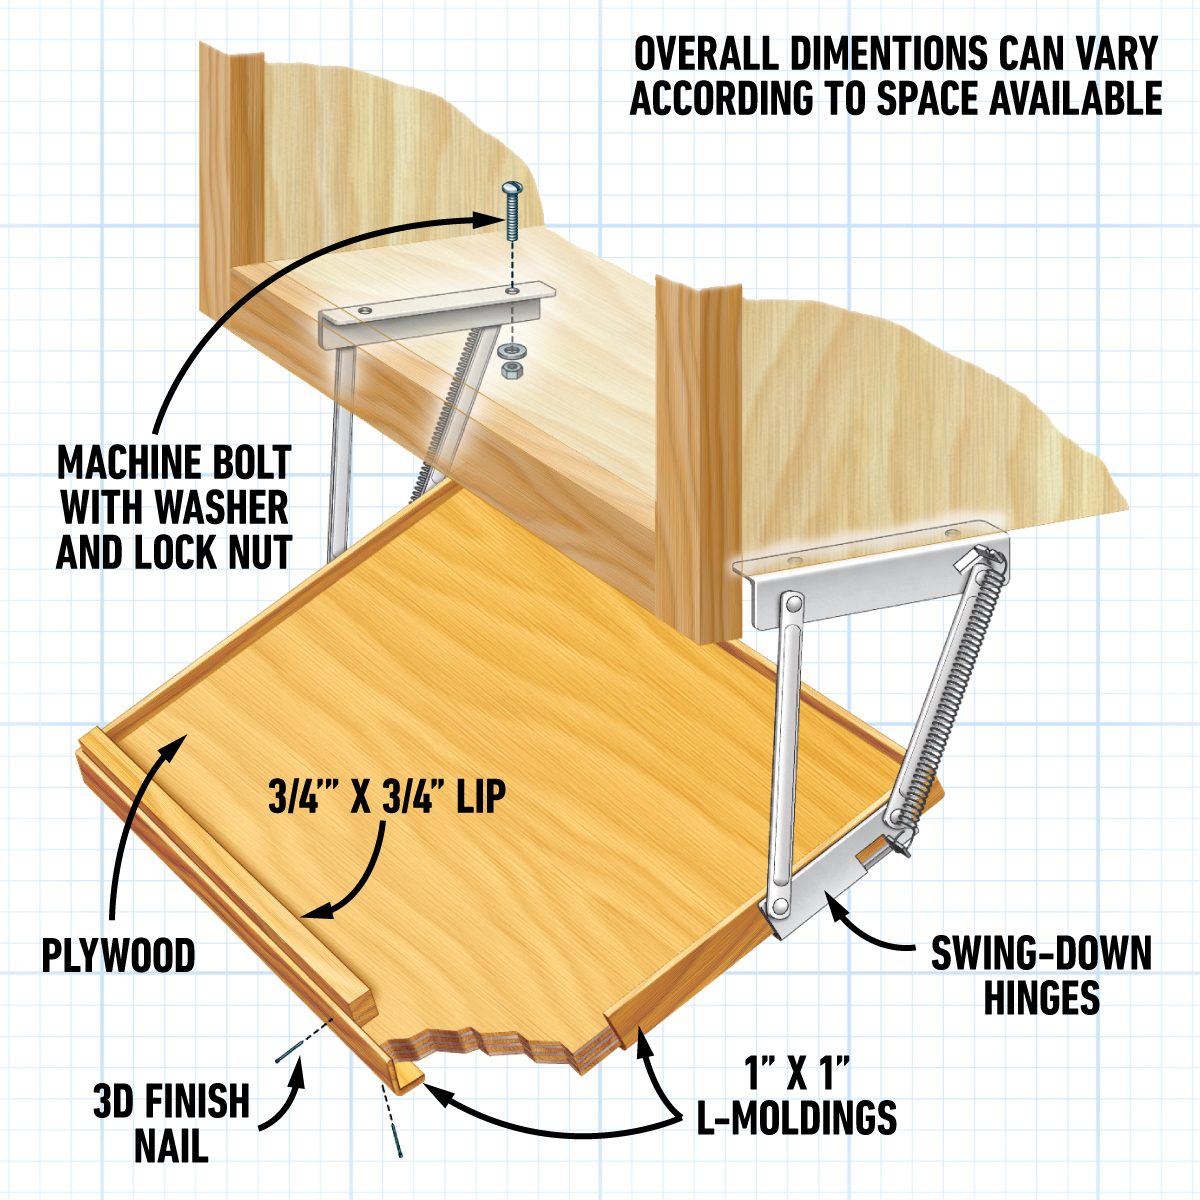
Cut the 1/2-in. thick plywood base to size. To get straight cuts, measure from the edge of your circular saw base to the edge of the blade, then clamp a straight board to the plywood using that distance from your cutting line to serve as a guide. Cut with the plywood’s good side down.
Glue and nail the 3/4 x 3/4-in. lip to the front of the base, then picture frame the plywood with L-moldings. For an exact measurement, cut one end at 45 degrees on a miter saw, hold it in position and mark the other end. Put a reminder mark on the board so you remember which direction to cut the angle. Secure the pieces with carpenter’s glue and 3d nails.
Mount the swing-down hinges to your base using wood screws. Hold the assembled unit in position under the cabinet, then mark the holes for the brackets. This is a two-person job. Drill the holes, then secure the brackets to the cabinet using short machine screws, washers and nuts.
Blind-Corner Glide-Out and Swing-Out Shelves
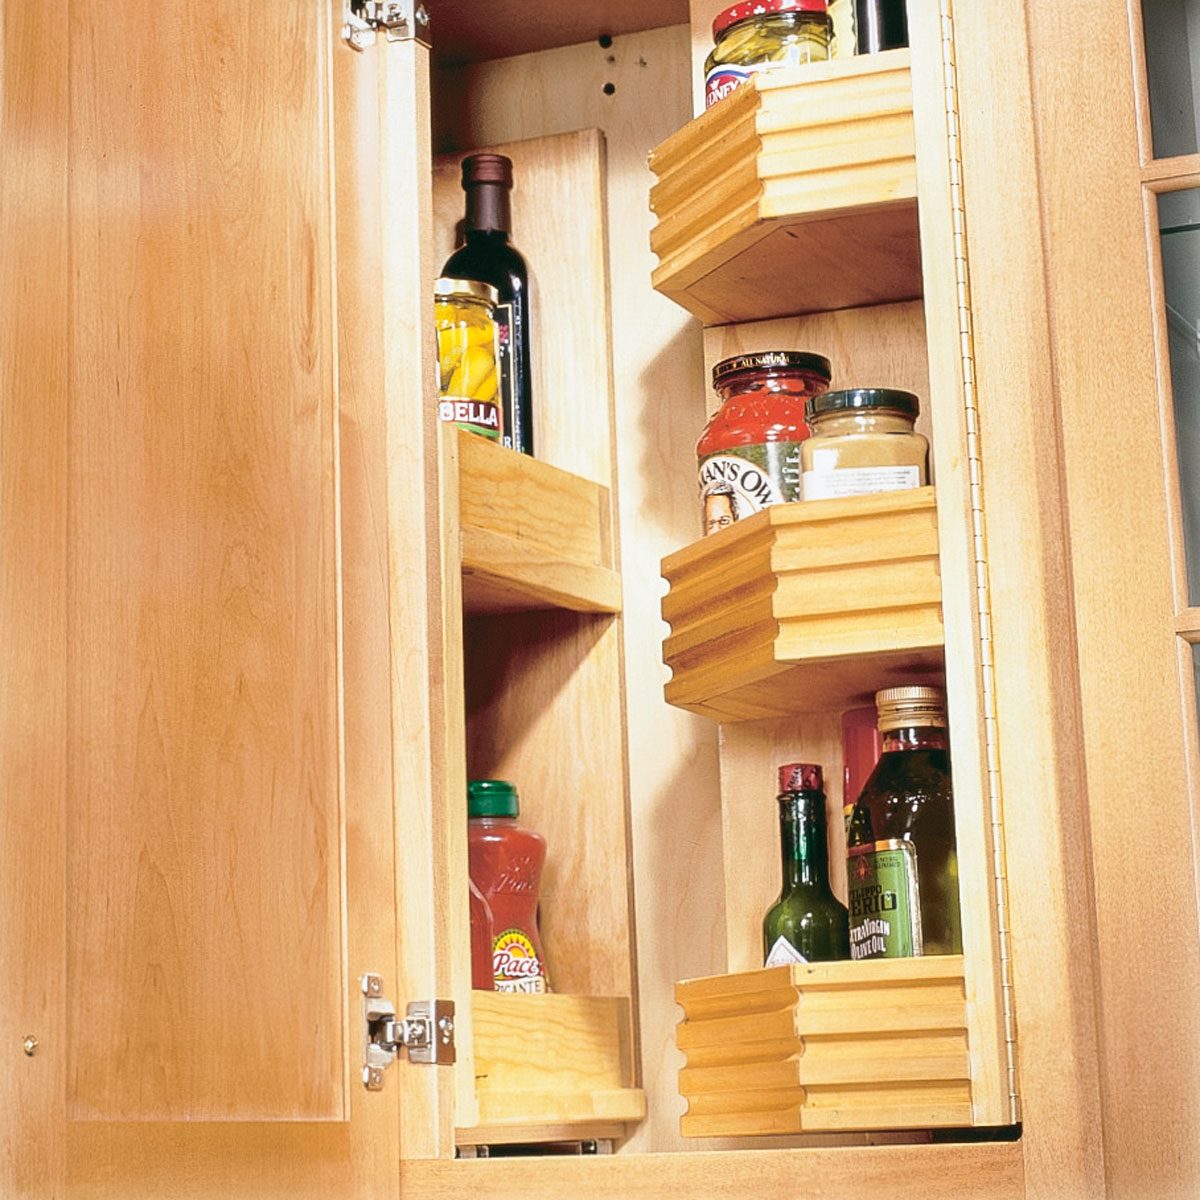
Blind-corner cabinetsthose with a blank face that allows another cabinet to butt into themmay be great for aging wine, but they’re darn near impossible to see and reach into. These kitchen storage projects will give you a pair of accessories puts an end to this hidden wasteland. The hinged shelf swings out of the way, and the gliding shelf slides forward so you can access food items stored in the back. You can use the same hardware and techniques to make base cabinets more accessible.
The key measurements and clearances:
Glide-out shelf dimensions
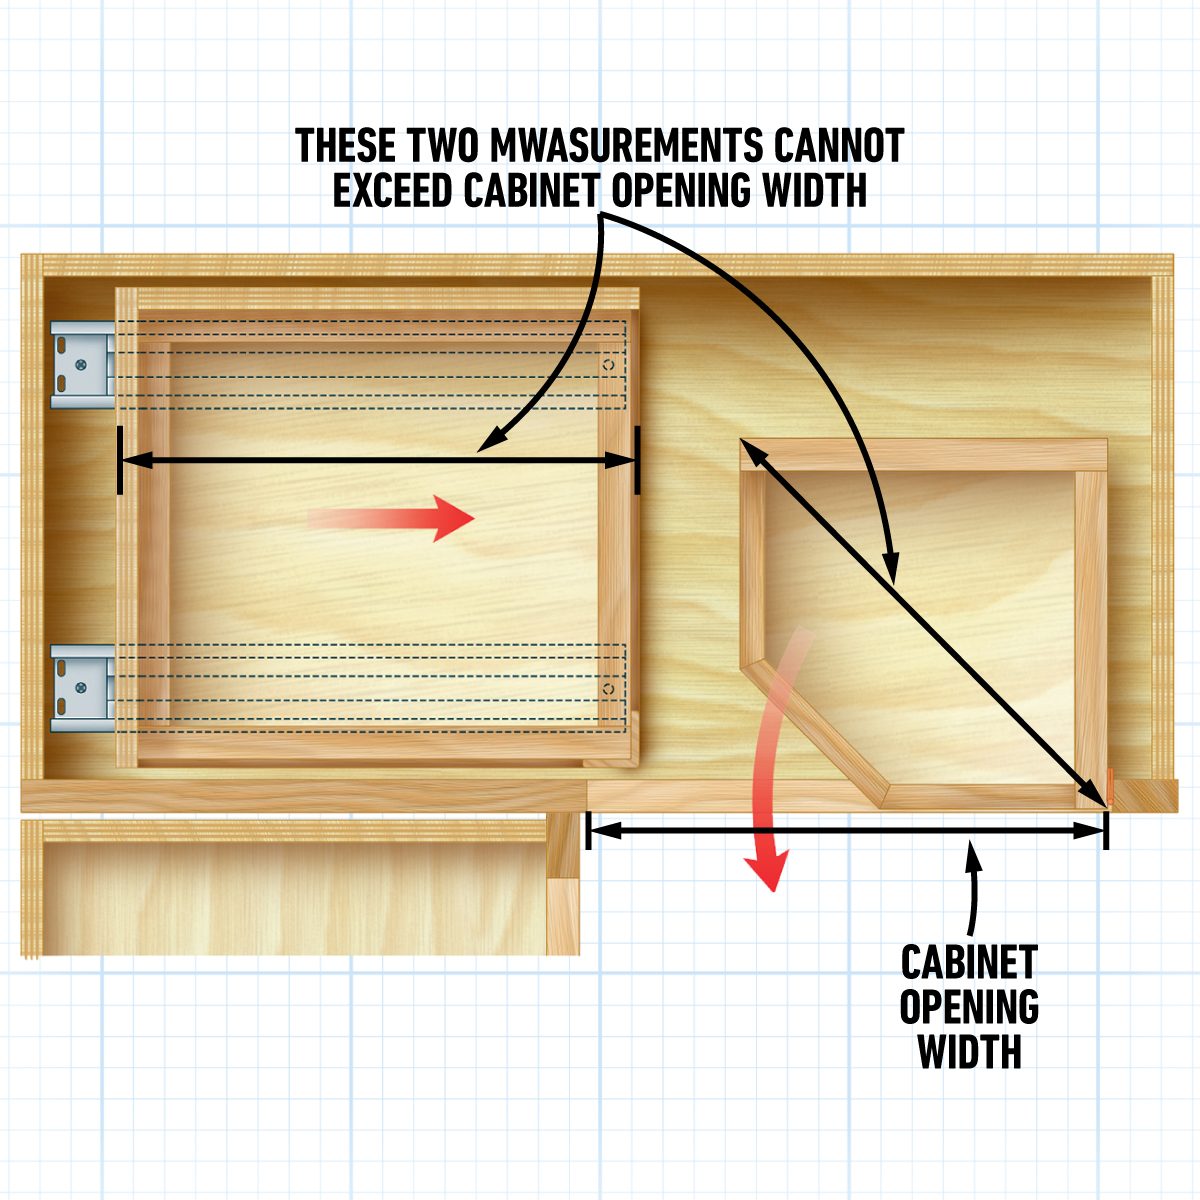
You can only make the unit as long as the door opening is wide (or else you can’t fit it in!). Make the unit about 1/2-in. narrower than the inside width of the cabinet. Test-fit your shelf units in the cabinet as you work.
Swing-out tray dimensions
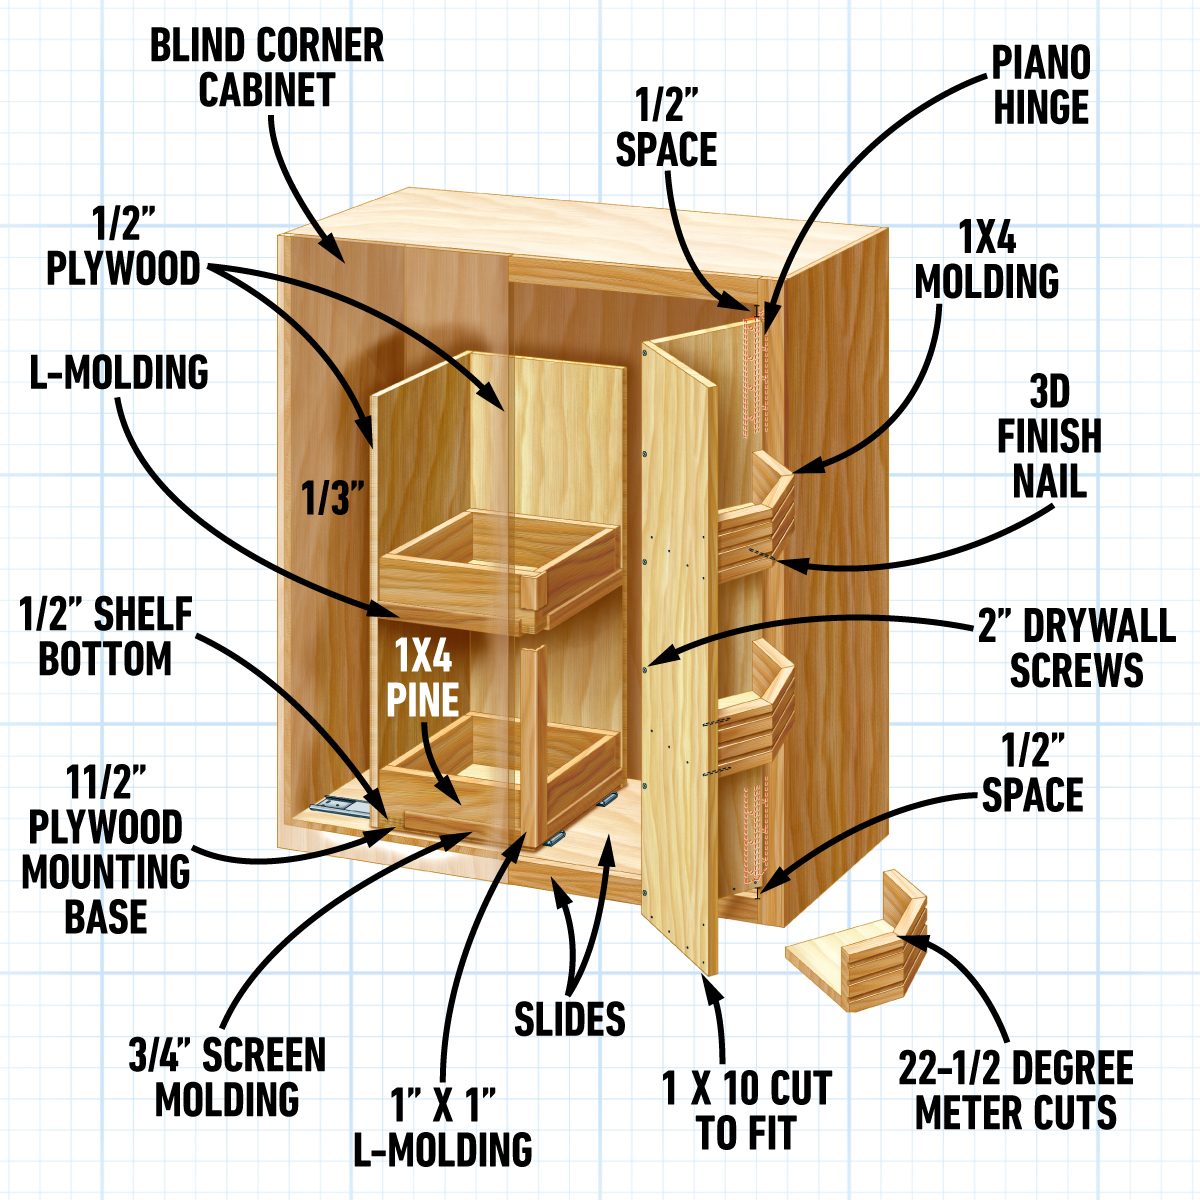
The corner-to-corner or diagonal measurement of the unit can’t exceed the width of the door opening (or else that won’t fit either!). Make the unit about 1 in. shorter than the opening height so it has room to swing freely when installed. Piano hinges and bottom slides are available from woodworking suppliers and home centers.
Cut out the two plywood sides, then glue and nail the corners. Connect the trays to the two plywood sides using 1-in. drywall screws, then cut and nail L-molding to support the front corner. Cut and install L-moldings to support and cover the exposed plywood edges of the upper tray. Install 3/4-in. screen molding to cover the plywood edges of the bottom tray.
Cut the mounting base plywood slightly smaller than the other tray bottoms, then secure the two slides parallel to each other about 1-in. from each edge. Slip this mounting base into the opening, extend the slides, then screw them to the cabinet bottom at the rear of the cabinet. Install the slides parallel to the cabinet sides so the base slides back and forth freely.
Screw the tray unit to the mounting base using 3/4-in. screws. After installing the first screw, slide the unit forward and back. Then adjust it until it runs parallel to the cabinet sides and install three more screws.
Glue and nail the 1x3s together using 4d finish nails, then secure the plywood bottom with 3d finish nails.
Cut the 1×10 swing-out uprights to length and width (one should be 3/4 in. narrower than the other). Use a countersink bit to predrill holes along one edge, then glue and screw the two edges together. The diagonal measurement should be less than the cabinet opening.
Assemble the shelf unit. First, mark the shelf positions on the uprights and pre-drill holes from the front side. Create the three shelves by cutting a 1×10 to length and width, then cutting the corner at 45 degrees. Hold the shelves in place and drive drywall screws through these holes from the backside into the shelves. Cut the 22-1/2 degree angles on the front moldings and secure them with 3d finish nails. You can use any type of wide decorative molding that’s at least 1/2 x 3 in.
Screw the piano hinge to the front edge of the swing-out unit, then to the edge of the cabinet face frame. Make certain the swing-out has 1/2 in. of clearance top and bottom. Use an assistant to help you lift and hold the unit at the proper height while you’re securing it to the cabinet.
Roll-Out Pantry Cabinet
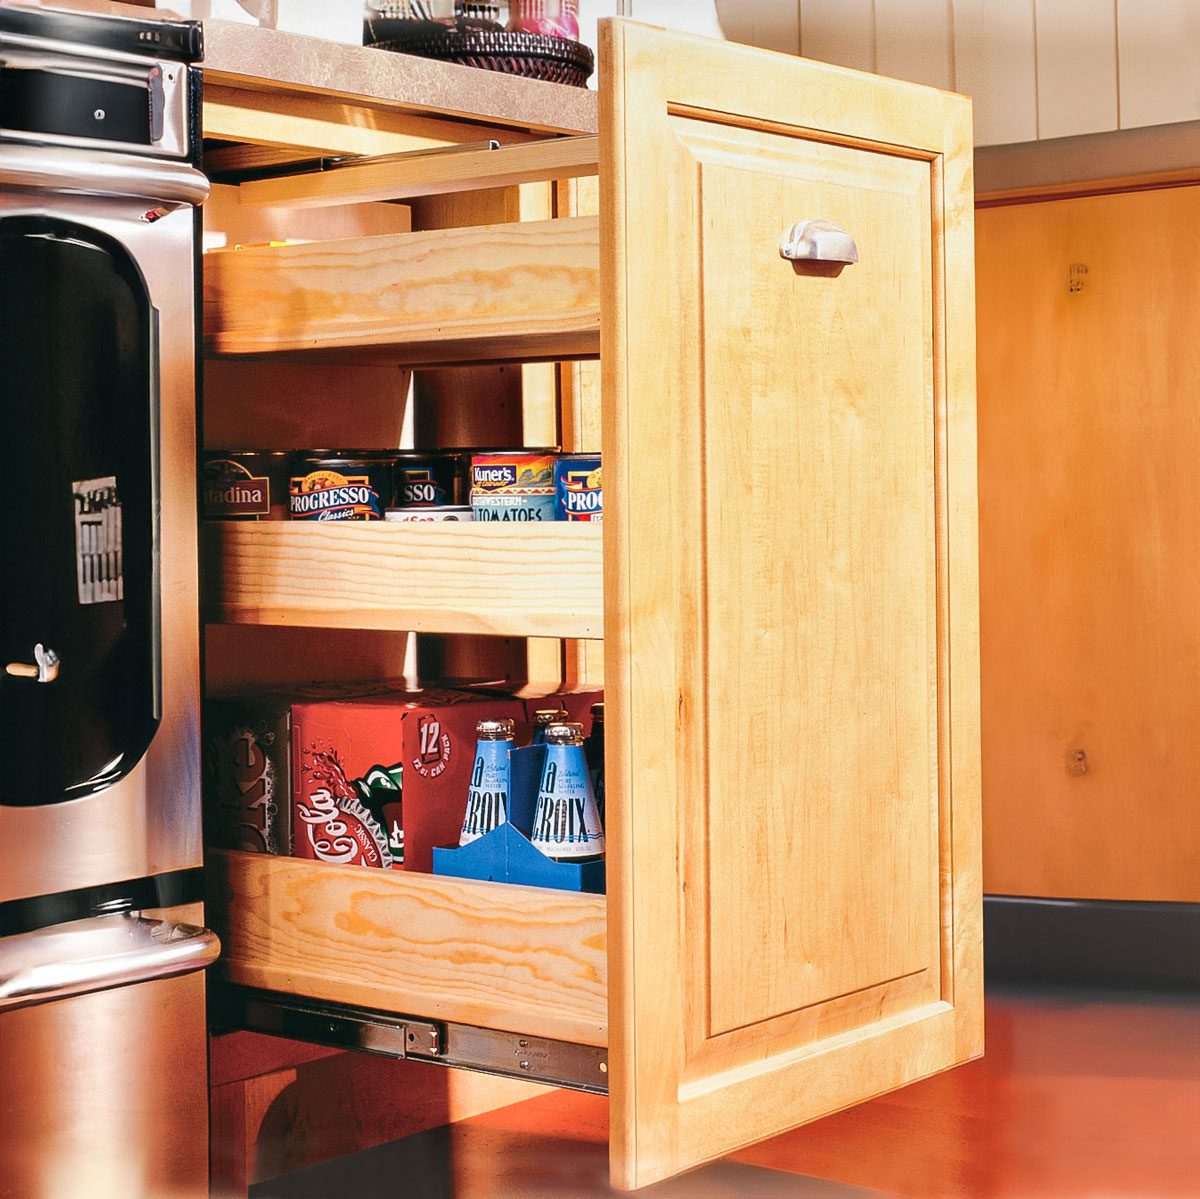
Roll-out shelves open up inaccessible space in the back of deep base cabinets. Most cabinet manufacturers now include roll-out shelves in their base cabinets. But if you don’t have this convenience, this is one of the better kitchen storage projects to one-up those shelves. Here we’ll show you how to make an entire roll-out pantry.
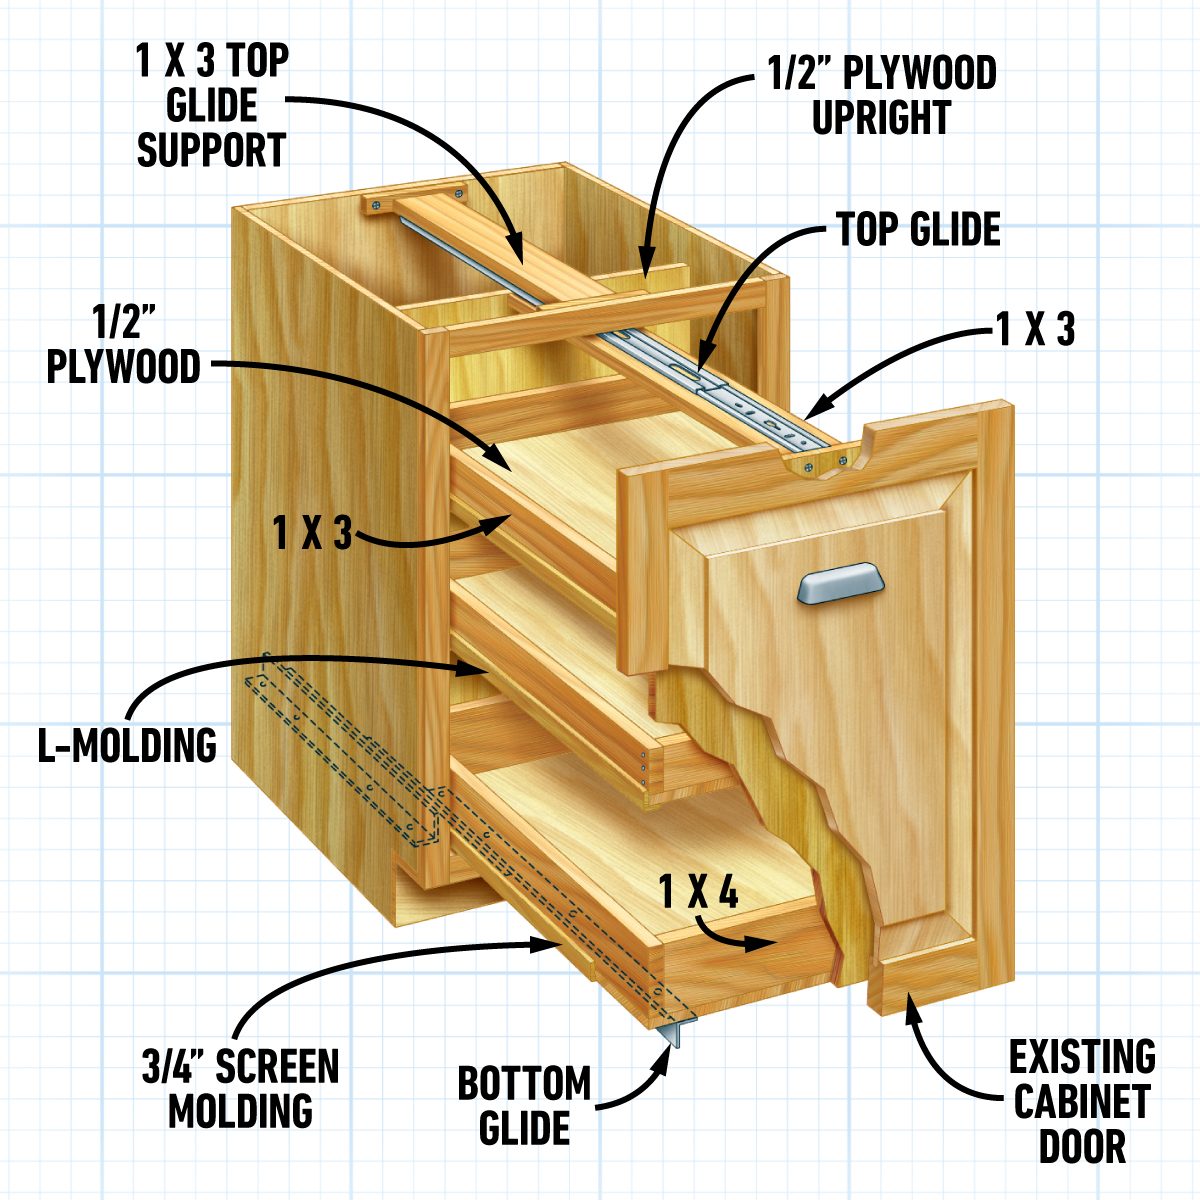
The hardware consists of two heavy-duty bottom-mounted slides and one center-mounted top slide that together can support 130 lbs. Again, construct your unit to suit your needs. We made our bottom tray 3-1/2 in. tall and the upper ones 2-1/2 in. tall. You may want to include only two trays if you’ll be storing cereal boxes and other tall packages.
Since you’ll be converting your door from swinging to rolling mode, you’ll need to remove the door and hinges. You’ll also have to remove the existing handle and reinstall it centered on the door. If your hardware mounts from the backside, install it before attaching the door.
The key measurements and clearances:
Roll-out unit measurements
The plywood front and back panels should be about 1/8 in. shorter than the distance between the installed top and bottom glides. The width of the unit should be 1/2 in. narrower than the cabinet opening. The depth of the unit should be 1/2 in. less than the depth of the cabinet, not including the face frame.
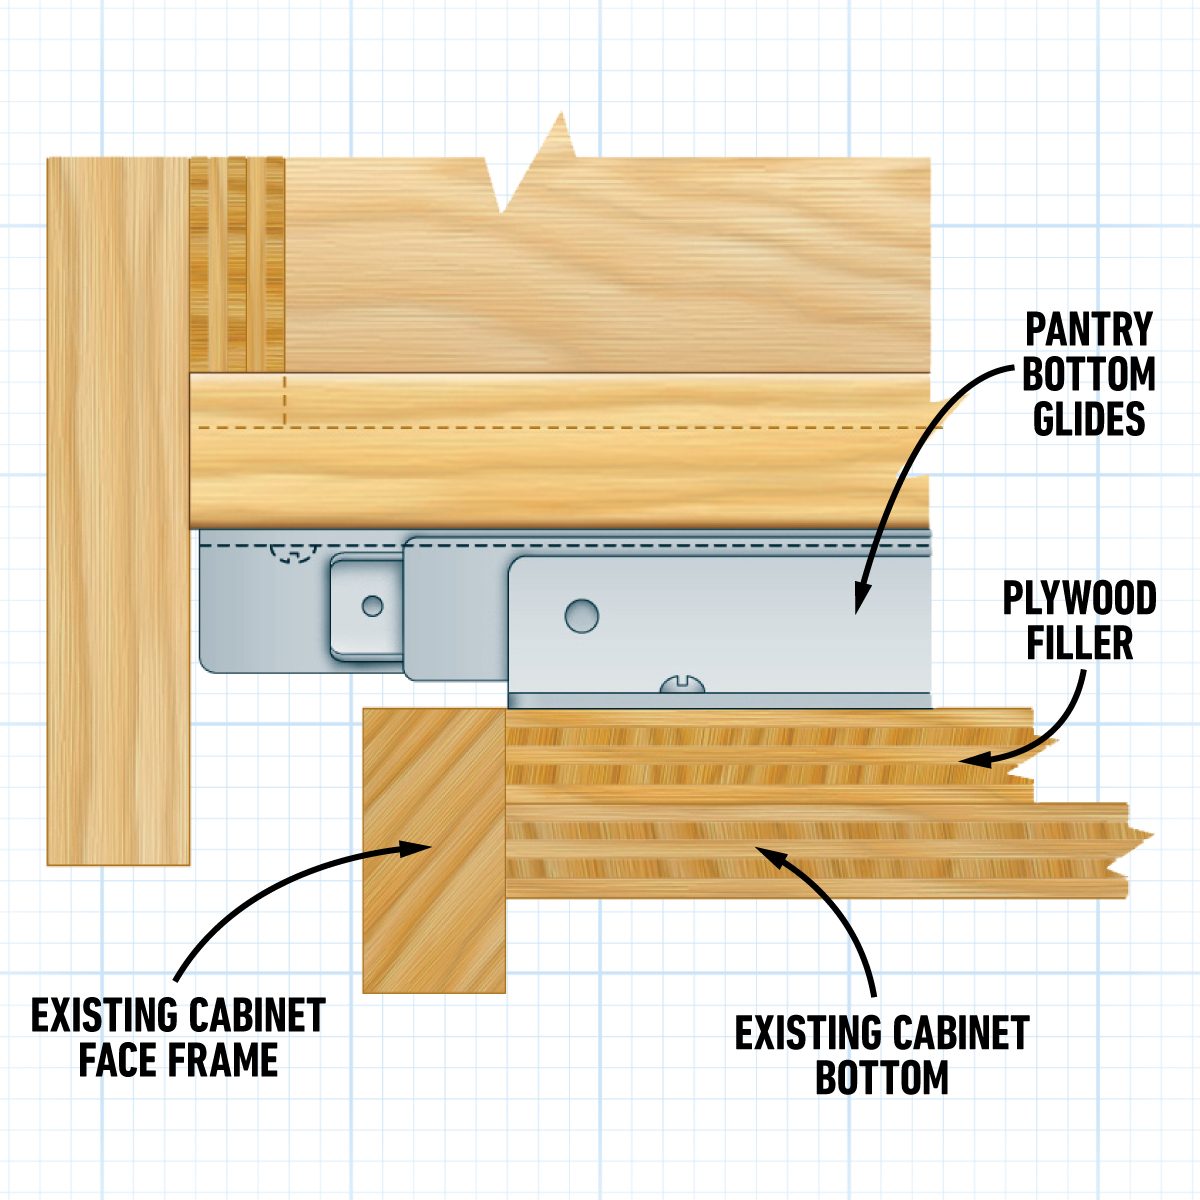
Measure the cabinet face frame opening, then subtract the height of the top and bottom glides. Use the guidelines given to arrive at the depth, width and height of your pantry unit. Be sure to install the bottom glides so they run parallel to the cabinet sides. If necessary, use plywood to raise the cabinet bottom even with the bottom lip of the face frame.
Install the top glide support and top glide so the support is level and flush to the top of the frame opening. Screw plywood flanges to each end of the 1×3 support beforehand to make it simpler to secure it to the front and back of the cabinet.
Assemble the pantry trays using 1x4s, 1x3s, 6d nails and carpenter’s glue. Use the plywood bottoms to square up the trays before nailing them on. L-moldings support and cover the plywood edges of the upper two trays; 3/4-in. screen molding covers the exposed plywood edges of the bottom tray.
Secure the trays to the 1/2-in. plywood uprights using glue and drywall screws. Arrange the spacing of the trays to meet your needs.
Screw the tray assembly to the bottom runners. While you do this, make sure it’s centered in the opening and running parallel to the cabinet sides. The extended portion of the top slide is secured to a 1×3 screwed between the two plywood uprights. You can loosen this 1×3, then adjust the height so the top glide runs flat and smooth.
Clamp the cabinet door to the front of the pantry assembly; center it and make the height even with adjacent doors. Pre-drill eight holes through the plywood upright and drive screws into the back of the cabinet door. After installing two screws, close the door to check its alignment with the adjacent doors. Make adjustments, then install the remaining screws. Use short screws so they don’t penetrate the front of the cabinet door.
------------------------------------
By: Rebecca Wright Brown
Title: 4 Easy DIY Projects to Create More Kitchen Storage Space
Sourced From: www.familyhandyman.com/article/easy-diy-projects-to-create-more-kitchen-storage-space/
Published Date: Mon, 03 Jun 2024 15:31:18 +0000
Did you miss our previous article...
https://conservativedailytimes.com/lifestyle/for-the-birds-or-can-bird-watching-help-your-wellbeing
.png)
